PuTTY: Difference between revisions
Jump to navigation
Jump to search
DRSDavidSoft (talk | contribs) m (Updated formatting) |
DRSDavidSoft (talk | contribs) m (Updated formatting) |
||
| Line 7: | Line 7: | ||
To connect to a device via serial using PuTTY: | To connect to a device via serial using PuTTY: | ||
# '''Identify the Serial Port''': | # '''Identify the Serial Port''': | ||
#* '''On Windows''': Check the assigned COM port via Device Manager under "Ports (COM & LPT)". | #*'''On Windows''': Check the assigned COM port via Device Manager under "Ports (COM & LPT)". | ||
#*'''On Linux/macOS:''' Use <code>ls /dev/tty*</code> to identify the appropriate device (e.g., <code>/dev/ttyUSB0</code>). | #*'''On Linux/macOS:''' Use <code>ls /dev/tty*</code> to identify the appropriate device (e.g., <code>/dev/ttyUSB0</code>). | ||
#'''Launch PuTTY:''' | |||
#'''Launch PuTTY''' | |||
#*Open the PuTTY application. | #*Open the PuTTY application. | ||
#'''Configure Connection Settings''': | #'''Configure Connection Settings''': | ||
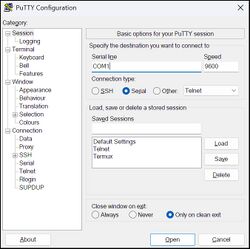
#*Under the "Session" category: | #*Under the "Session" category: | ||
#** '''Connection type''': Select '''Serial'''. | #**'''Connection type''': Select '''Serial'''. | ||
#** '''Serial line''': Enter the appropriate port (e.g., <code>COM3</code> or <code>/dev/ttyUSB0</code>). | #**'''Serial line''': Enter the appropriate port (e.g., <code>COM3</code> or <code>/dev/ttyUSB0</code>). | ||
#**'''Speed''': Set the baud rate (e.g., <code>115200</code>). | #**'''Speed''': Set the baud rate (e.g., <code>115200</code>). | ||
#'''Set Serial Parameters''': | #'''Set Serial Parameters''': | ||
#* Navigate to "Connection" | #*Navigate to "Connection" → "Serial": | ||
#** '''Data bits''': Typically <code>8</code>. | #**'''Data bits''': Typically <code>8</code>. | ||
#** '''Stop bits''': Typically <code>1</code>. | #**'''Stop bits''': Typically <code>1</code>. | ||
#** '''Parity''': Usually <code>None</code>. | #**'''Parity''': Usually <code>None</code>. | ||
#** '''Flow control''': Often set to <code>None</code>. | #**'''Flow control''': Often set to <code>None</code>. | ||
#'''Initiate Connection''': | #'''Initiate Connection''': | ||
#* Click '''Open''' to start the session. | #*Click '''Open''' to start the session. | ||
===Session Logging === | ===Session Logging=== | ||
To record session output: | To record session output: | ||
#During an active session, right-click on the PuTTY window title bar and select '''Change Settings'''. | #During an active session, right-click on the PuTTY window title bar and select '''Change Settings'''. | ||
#Navigate to "Session" | #Navigate to "Session" → "Logging". | ||
#Choose '''All session output'''. | #Choose '''All session output'''. | ||
#Specify a log file location and name. | #Specify a log file location and name. | ||
# Click '''Apply''' to start logging. | #Click '''Apply''' to start logging. | ||
===Best Practices=== | ===Best Practices=== | ||
| Line 55: | Line 51: | ||
*[https://www.chiark.greenend.org.uk/~sgtatham/putty/ Official PuTTY Website] | *[https://www.chiark.greenend.org.uk/~sgtatham/putty/ Official PuTTY Website] | ||
*[https://documentation.help/PuTTY/ PuTTY User Manual] | *[https://documentation.help/PuTTY/ PuTTY User Manual] | ||
*[https://www.youtube.com/watch?v=29MZCza_dOs Video Tutorial: Using PuTTY for Serial Communication] | *[https://www.youtube.com/watch?v=29MZCza_dOs Video Tutorial: Using PuTTY for Serial Communication] | ||
[[Category:Serial Communications]] | [[Category:Serial Communications]] | ||
[[Category:Terminal Emulators]] | [[Category:Terminal Emulators]] | ||
[[Category:Hardware Debugging Tools]] | [[Category:Hardware Debugging Tools]] | ||
Latest revision as of 12:38, 15 May 2025
PuTTY as a Serial Terminal
PuTTY is a free and open-source terminal emulator developed by Simon Tatham. While widely known for SSH and Telnet capabilities, it also functions effectively as a serial console, making it invaluable for interfacing with embedded systems, routers, and microcontrollers via UART.
Establishing a Serial Connection
To connect to a device via serial using PuTTY:
- Identify the Serial Port:
- On Windows: Check the assigned COM port via Device Manager under "Ports (COM & LPT)".
- On Linux/macOS: Use
ls /dev/tty*to identify the appropriate device (e.g.,/dev/ttyUSB0).
- Launch PuTTY:
- Open the PuTTY application.
- Configure Connection Settings:
- Under the "Session" category:
- Connection type: Select Serial.
- Serial line: Enter the appropriate port (e.g.,
COM3or/dev/ttyUSB0). - Speed: Set the baud rate (e.g.,
115200).
- Under the "Session" category:
- Set Serial Parameters:
- Navigate to "Connection" → "Serial":
- Data bits: Typically
8. - Stop bits: Typically
1. - Parity: Usually
None. - Flow control: Often set to
None.
- Data bits: Typically
- Navigate to "Connection" → "Serial":
- Initiate Connection:
- Click Open to start the session.
Session Logging
To record session output:
- During an active session, right-click on the PuTTY window title bar and select Change Settings.
- Navigate to "Session" → "Logging".
- Choose All session output.
- Specify a log file location and name.
- Click Apply to start logging.
Best Practices
- Connect Ground First: Always establish a common ground between devices before connecting TX/RX lines.
- Cross TX/RX Lines: Connect the adapter's TX to the device's RX, and vice versa.
- Verify Voltage Levels: Ensure compatibility between the adapter's logic level and the target device to prevent damage.
- Avoid Backfeeding Power: If the target device is self-powered, do not connect the adapter's VCC line.
Features
- 🖥️ Cross-platform: Available mainly for Windows, can also be used under Linux, and macOS.
- 🔌 Serial Communication: Supports direct connections to serial ports.
- 🛠️ Customizable Settings: Configurable baud rate, data bits, parity, stop bits, and flow control.
- 📄 Session Logging: Ability to log session output for debugging purposes.
- 💾 Session Management: Save and load session profiles for repeated use.
